Wyng Loyalty: Setup & Data Flow Guide
Overview
Wyng Loyalty, an extension of the existing Profiles product, lets you reward end-users for what they do in your brand experiences. You decide which activities earn or burn points, and how many. Wyng validates each activity, records it in a ledger, and keeps point totals up to date on each end-user's Wyng Profile.
This guide walks through setup and shows how data moves in and out of Wyng. Start here for an end-to-end walkthrough, then refer to the Profiles SDK and Profiles API documentation for detailed technical reference.
Key concepts
| Term | Definition |
|---|---|
| End-user | A member of the public who interacts with your experiences. End-users earn and burn points, and each has a Wyng Profile. |
| Platform user | A member of your team who logs in to the Wyng Platform to configure the Data Model and actions, or to review end-user points and ledgers. |
| Profile | The record Wyng keeps for each end-user. It holds their profile attributes, such as email and point totals, along with their ledger history. |
| Data Model | The list of Profile attributes stored on each end-user's Wyng Profile. |
| Profile attribute | A field in the Data Model that captures a particular piece of data about the end-user. |
| Action | Something an end-user does that you want to reward or charge for, such as saving an article or buying a ticket. |
| Evaluator | A rule attached to an action. It adds points ("earn") or subtracts points ("burn") from a profile attribute. |
| Ledger | The permanent history of every validated ("applied") action and the points it moved. |
| Profiles API | Wyng's API for interacting with the "Profiles" product functionality and data. Can be used from back-end of native mobile apps. Profiles API documentation |
| Profiles SDK | Wyng's SDK (wrapper for Profiles API) to interact with the "Profiles" product functionality and data. Can be used from all web applications Profiles SDK documentation |
How it works:
- Define the Data Model
- Add profile attributes to hold points and counters for a specific end-user.
- Define actions
- Describe each kind of end-user activity you want to track.
- Define evaluators
- Attach rules to each action that earn or burn points, with optional limits, caps and date windows.
- Dispatch actions
- Your Wyng experiences send an action to Wyng when an end-user does something.
- Validate and record
- Wyng checks the action against its rules, updates point totals and writes the result to the ledger.
- Review in the Wyng Platform
- Your team can view points and ledger history for any profile.
- Use collected data in experiences or elsewhere
- Once an end-user is authenticated, the Profiles SDK and Profiles API returns their totals and ledger so you can tailor the experience.
Step 1: Define the Data Model
Before you can capture any end-user data, you need to set up a Data Model. The Data Model lives in the Wyng Platform, and you add profile attributes to it through the UI. For an overview of data model concepts and structure, see Getting started.
- Decide what data to capture
- Gather the information you want to collect from end-users, to identify them, to track their loyalty activity, or to personalize experiences. Examples: "First name", "Customer ID", "Email", "Saved article count", etc.
- Navigate to the Data Model in the platform
- In the Wyng Platform, open the Profiles tab.
- Open the "Data Model" tab.
- Add profile attributes to the Data Model
- If a Data Model does not already exist, click "Create data model."
- By default, the Data Model comes with an "Anonymous Visitor ID" (
uids) included. It is an ID created by Wyng that is attached to every end-user. This is a way to capture anonymous data and personalize anonymous sessions. If you do not plan to use or update profiles of anonymous visitors, this attribute should be deleted.
- By default, the Data Model comes with an "Anonymous Visitor ID" (
- Click "Add attribute" to add any profile attributes for each piece of data you would like to collect from end-users.
- Add any non-loyalty specific profile attributes that you may want to track, such as "First Name", "Opt-in", "Location."
- Add any loyalty specific profile attributes that you may want to track, such as "Total Points", "Saved Article Count", "Favorited Recipes Count", or "Labor Day 2026 Sweepstakes Complete."
- Add any "Known User Identifiers" that could provide a way to look up an end-user's Profile later on, such as "Customer ID", "Email", or "Phone Number."
- To designate a profile attribute as a Known User Identifier, it must have the "Is Key" policy selected.
- At least one Known User Identifier must be added to the Data Model.
- See the examples below for more information.
- If a Data Model does not already exist, click "Create data model."
- Confirm order of priority for Known User Identifiers
- Click "Identity resolution" to set the order Wyng uses to match an end-user to a Profile.
- Under "Known User Identifier" section, select from the drop-down your highest priority Known User Identifier.
- If your Data Model has more than one Known User Identifier, rank them in the "IDs Priority" section in the order Wyng should use to identify an end-user. When a session has more than one available, such as a customer ID and an email, Wyng uses the highest ranked one to look up the end-user's Profile.
- Finish
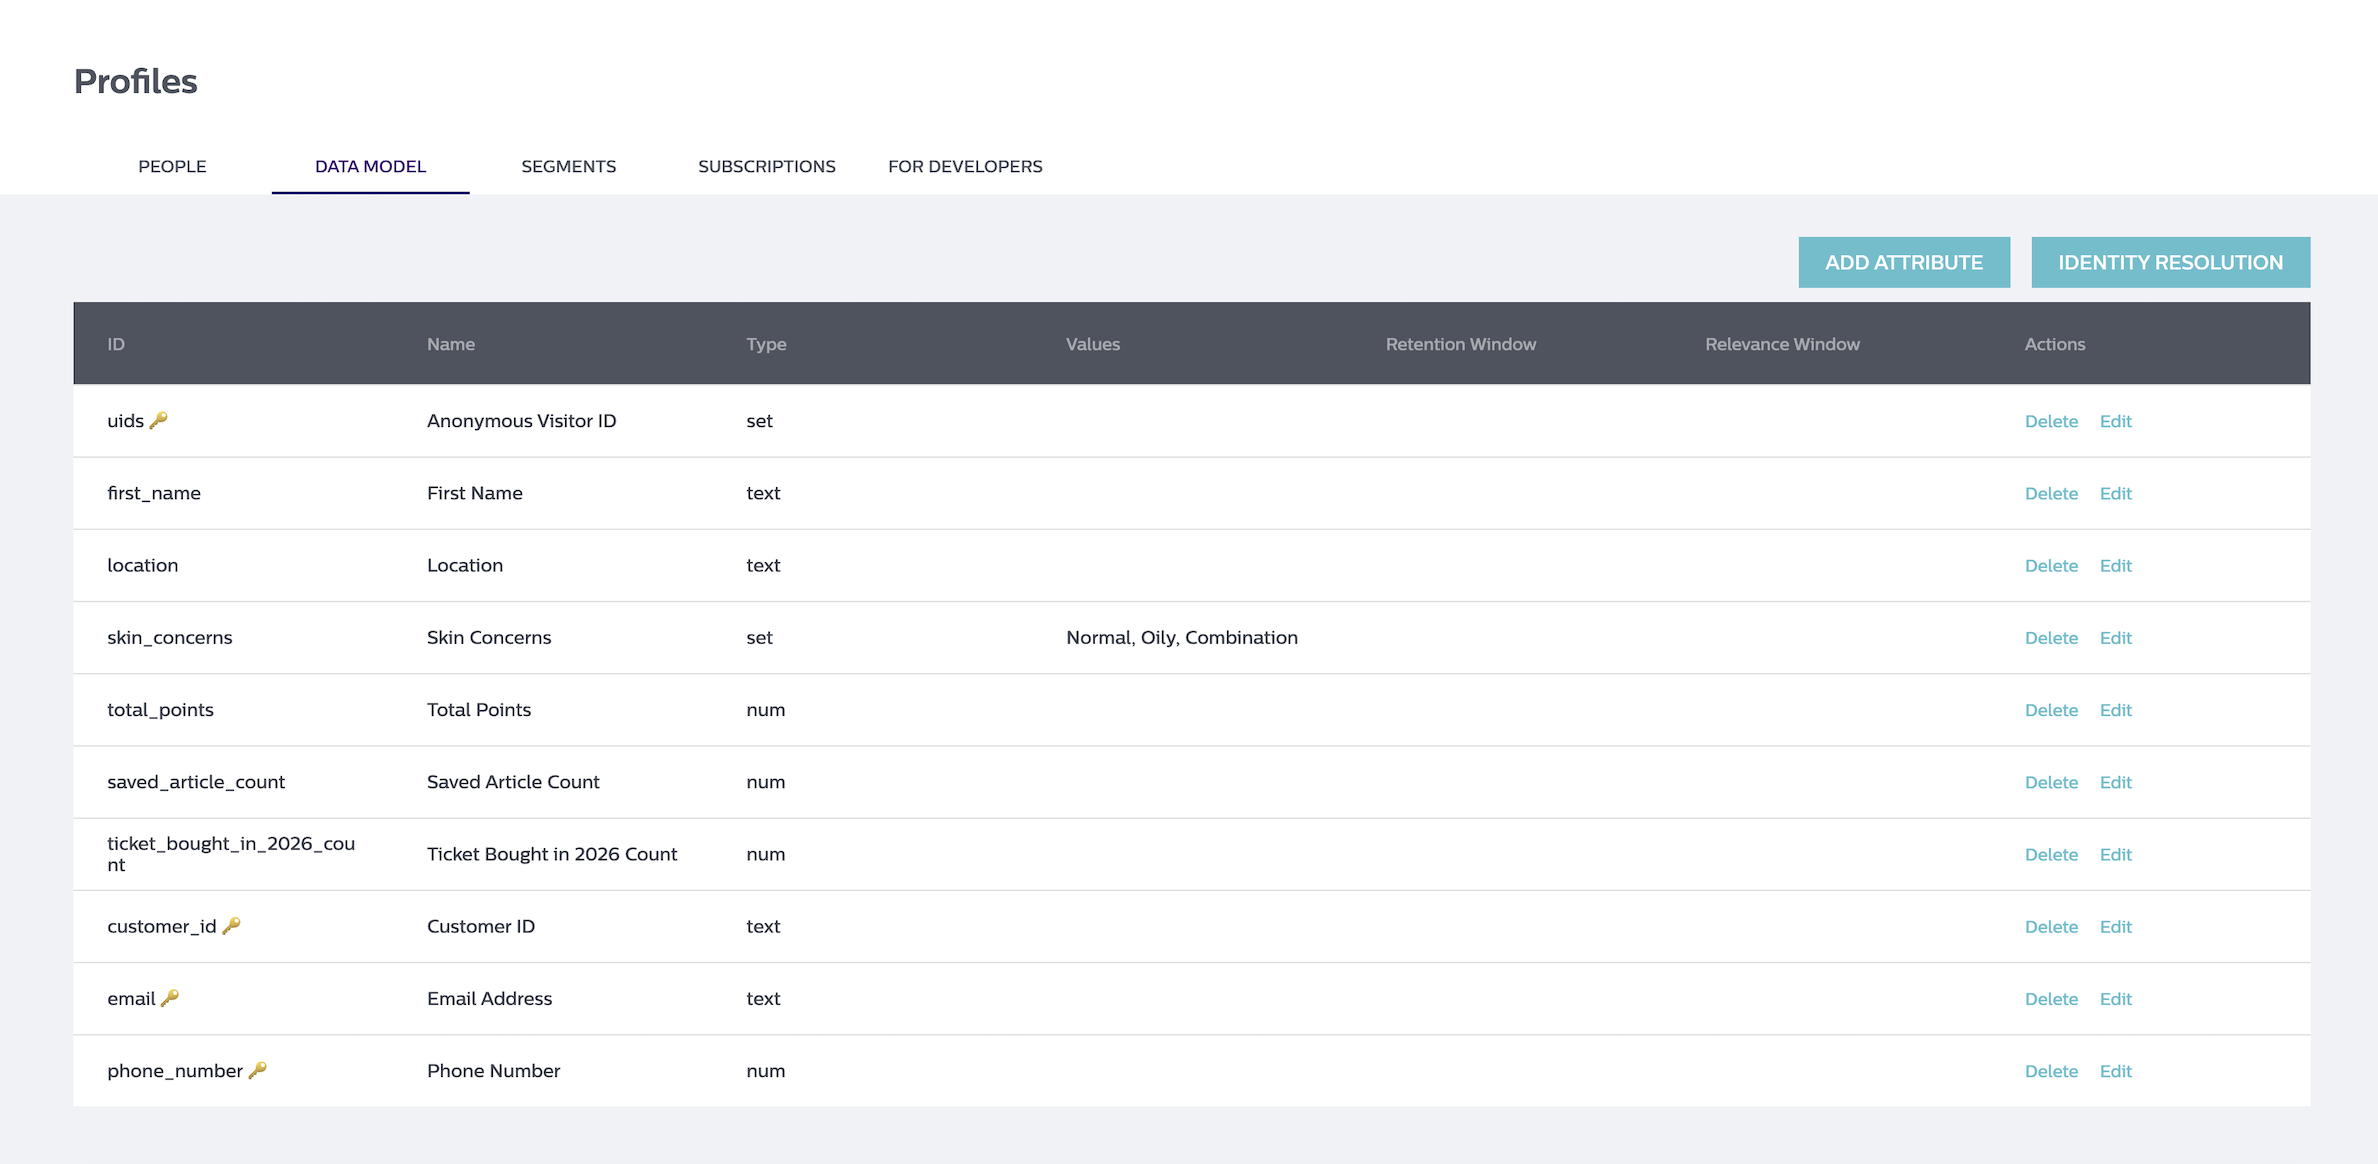
- Confirm the Data Model tab lists every attribute you plan to collect.
- With this in place, you are ready to define actions in Step 2.
Example Attributes
Non-loyalty Specific
| Attribute ID | Attribute Name | Type | Values | Policies: Is Key | Status | What it tracks |
|---|---|---|---|---|---|---|
first_name | First Name | text | N/A | Unchecked | Active | The end-user's first name. |
location | Location | text | N/A | Unchecked | Active | Where the end-user is based, such as a city or region. |
skin_concerns | Skin Concerns | set | Normal, Oily, Combination | Unchecked | Active | A list of values the end user may choose related to their skin concerns. |
Loyalty Specific
| Attribute ID | Attribute Name | Type | Values | Policies: Is Key | Status | What it tracks |
|---|---|---|---|---|---|---|
total_points | Total points | num | N/A | Unchecked | Active | The end-user's spendable point balance. |
saved_article_count | Saved Article Count | num | N/A | Unchecked | Active | How many articles the end-user has saved. |
ticket_bought_in_2026_count | Ticket Bought in 2026 Count | num | N/A | Unchecked | Active | How many tickets the end-user has bought in 2026. |
Known User Identifiers
| Attribute ID | Attribute Name | Type | Values | Policies: Is Key | Status | What it tracks |
|---|---|---|---|---|---|---|
customer_id | Customer ID | text or num | N/A | Checked | Active | The end-user's unique ID, used to look up their Profile. |
email | Email Address | text | N/A | Checked | Active | The end-user's email address. |
phone_number | Phone Number | text or num | N/A | Checked | Active | The end-user's phone number. |
Each profile attribute has more configuration options than the ones listed here. Platform users can set these however they need.
Example outcome
Step 2: Define actions
An action describes one kind of activity and what it does to an end-user's points. Start by defining the actions you want to track.
Unlike profile attributes, actions can only be added in the Data Model's JSON view.
Decide which actions to track
- List the end-user activities you want to reward or charge points for, such as "User read article", "User submitted form", "User saved article", or "User bought ticket."
Navigate to the Data Model JSON
- In the Wyng Platform, open the Profiles tab.
- Click the "For Developers" tab.
- This tab is read-only by default. Add
?edit=trueto the end of the page URL to make it editable.
dangerThe JSON should only be edited by platform users who are comfortable working with JSON. A formatting mistake in the JSON can cause errors in your Data Model and the data it captures. Keep a copy of the original JSON and validate your changes before saving.
Add the actions
- Find the
"user_actions"key, which contains an empty array. Add one object per action. See Action fields below for what each object can include.
- Find the
Finish
- Click "Save changes."
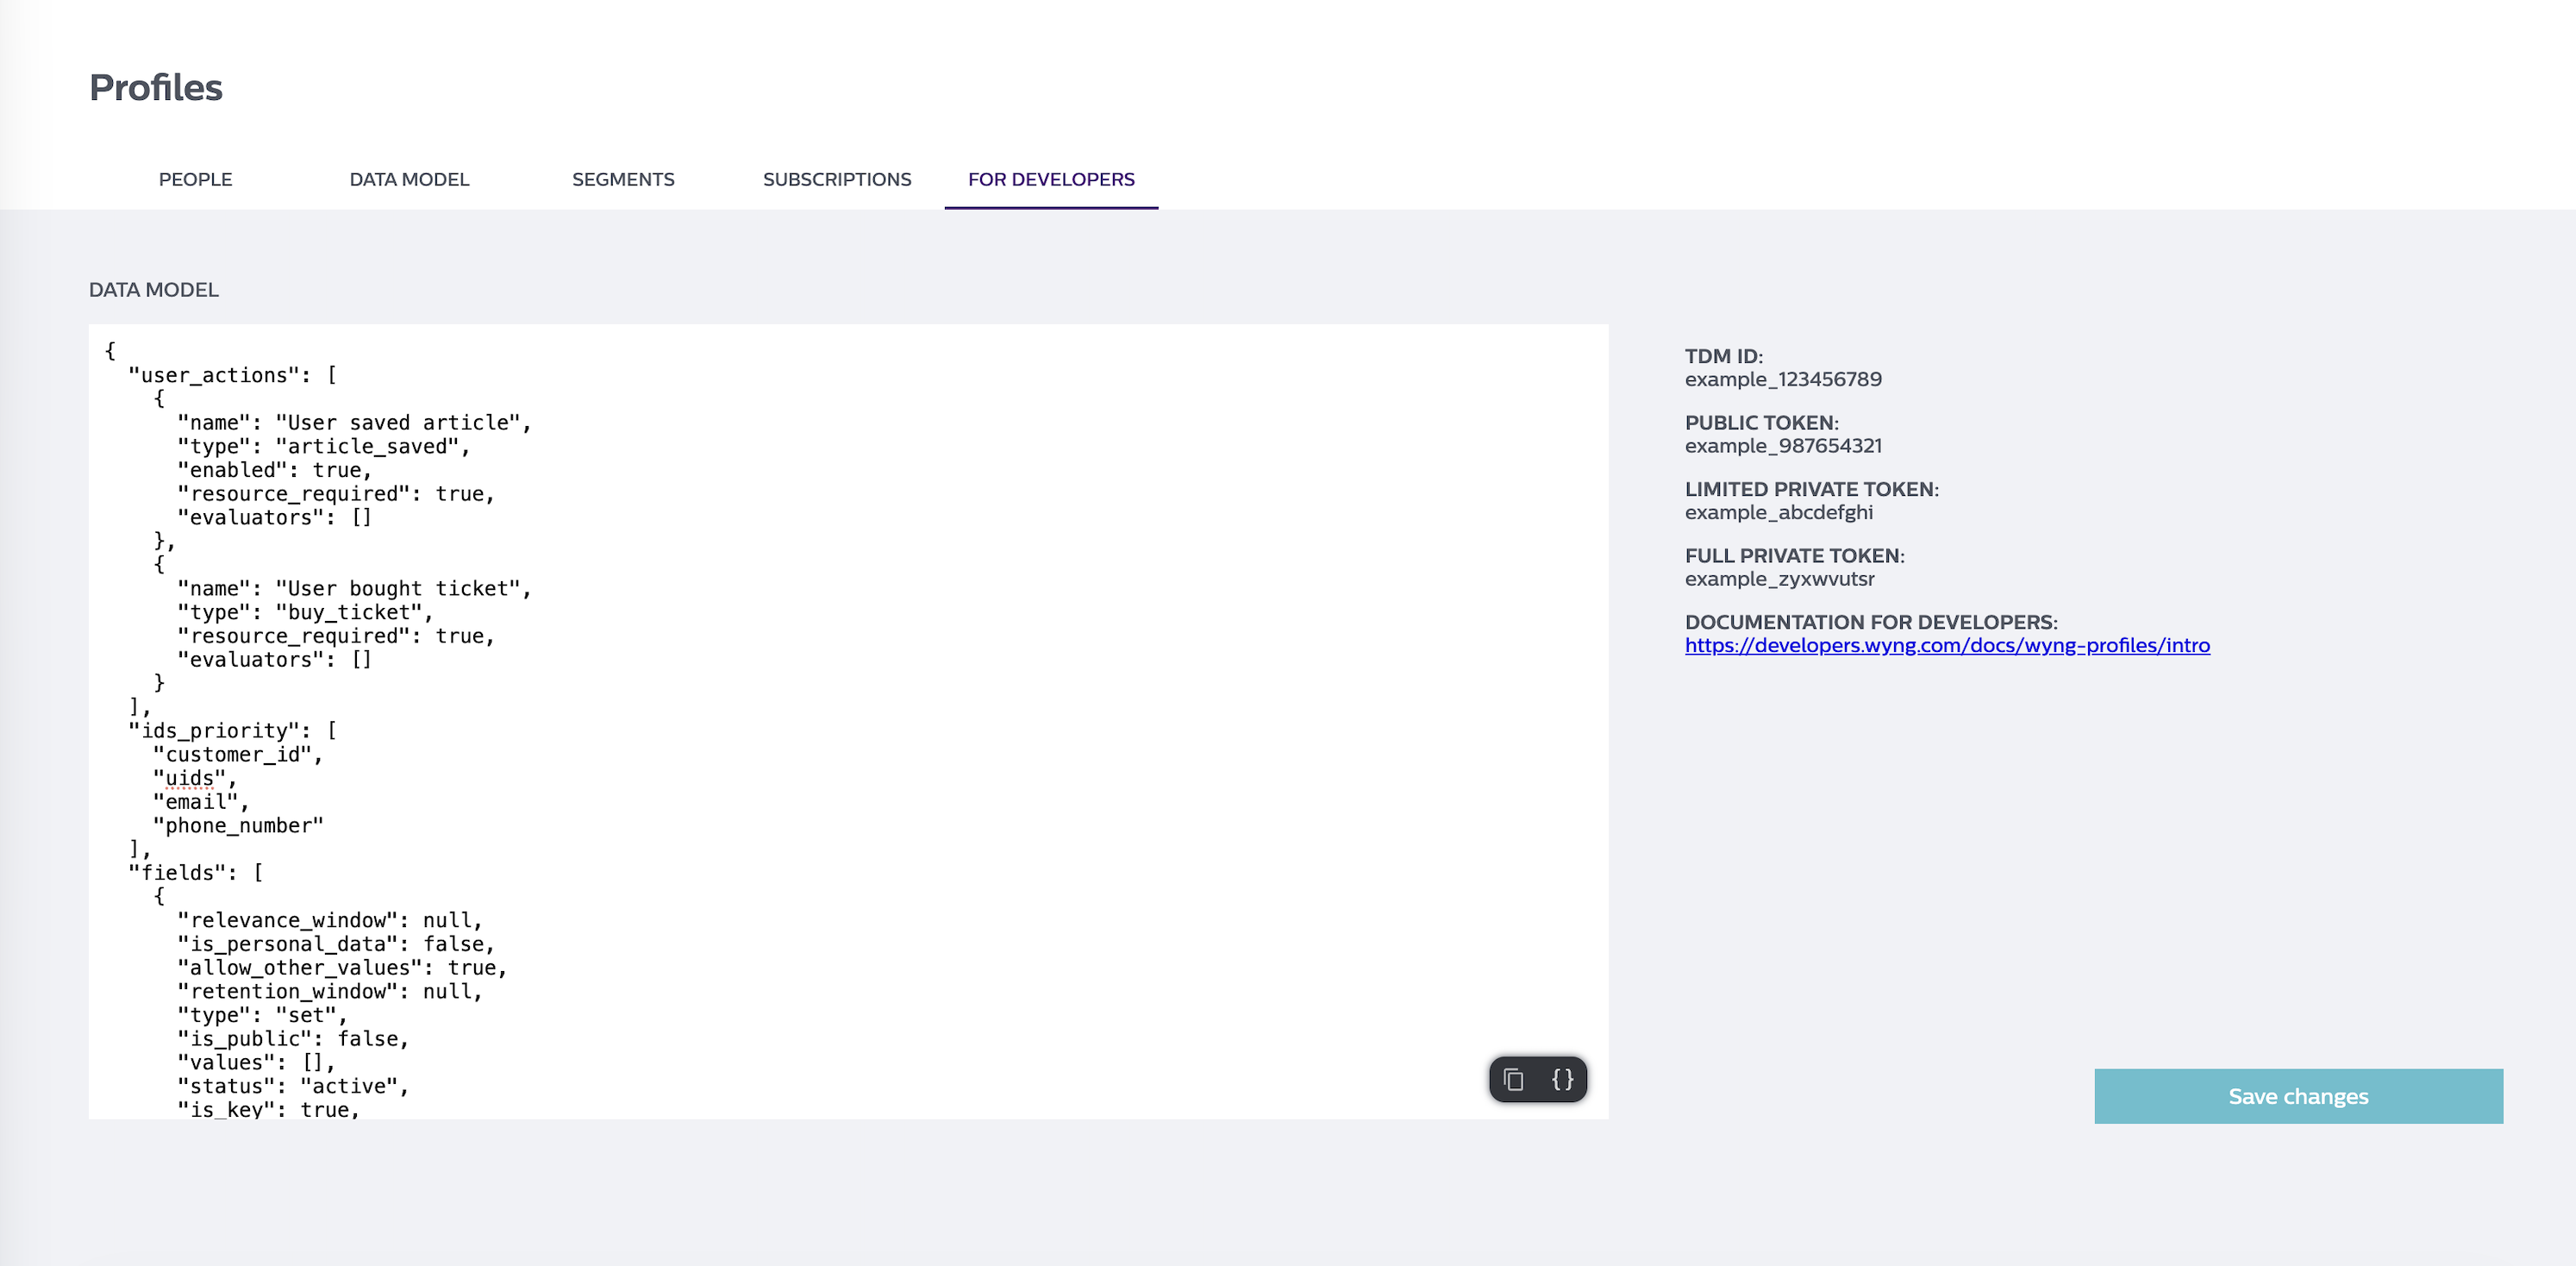
- Confirm that all actions now appear in the Data Model's JSON view.
- With this in place, your actions are defined and you are ready to add evaluators in Step 3.
Action fields
| Field | Type | Required | What it does |
|---|---|---|---|
name | String | No | Human-friendly name, such as "Read an article". |
type | String | Yes | Code-friendly, unique name for the action, such as article_read. |
enabled | Boolean | No (default true) | Turns the action on or off without deleting it. |
resource_required | Boolean | No (default false) | When true, every dispatch must include a resource that identifies what was acted on. |
evaluators | Array | No (default empty) | The earn and burn rules applied when the action is dispatched. |
Example action code
For now, set "evaluators" to an empty array. You will populate it in Step 3.
"user_actions": [
  {
    "name": "User saved article",
    "type": "article_saved",
    "enabled": true,
    "resource_required": true,
    "evaluators": []
  },
  {
    "name": "User bought ticket",
    "type": "buy_ticket",
    "enabled": true,
    "resource_required": true,
    "evaluators": []
  }
]
Example outcome
Step 3: Define evaluators
Evaluators are the rules attached to each action. Each one earns or burns points on a single profile attribute, and can be restricted by a usage limit, a points cap or a date window.
Like actions, evaluators are added in the Data Model's JSON view.
Decide how each action affects points
- For each action, decide which attribute it updates, how many points it earns or burns, and any limits, caps or date windows.
Navigate to the Data Model JSON
- In the Wyng Platform, open the Profiles tab.
- Click the "For Developers" tab.
- This tab is read-only by default. Add
?edit=trueto the end of the page URL to make it editable.
dangerThe JSON should only be edited by platform users who are comfortable working with JSON. A formatting mistake in the JSON can cause errors in your Data Model and the data it captures. Keep a copy of the original JSON and validate your changes before saving.
Add evaluators to each action
- Replace each action's empty
"evaluators"array with one object per rule. See Evaluator fields below.
- Replace each action's empty
Finish
- Click "Save changes."
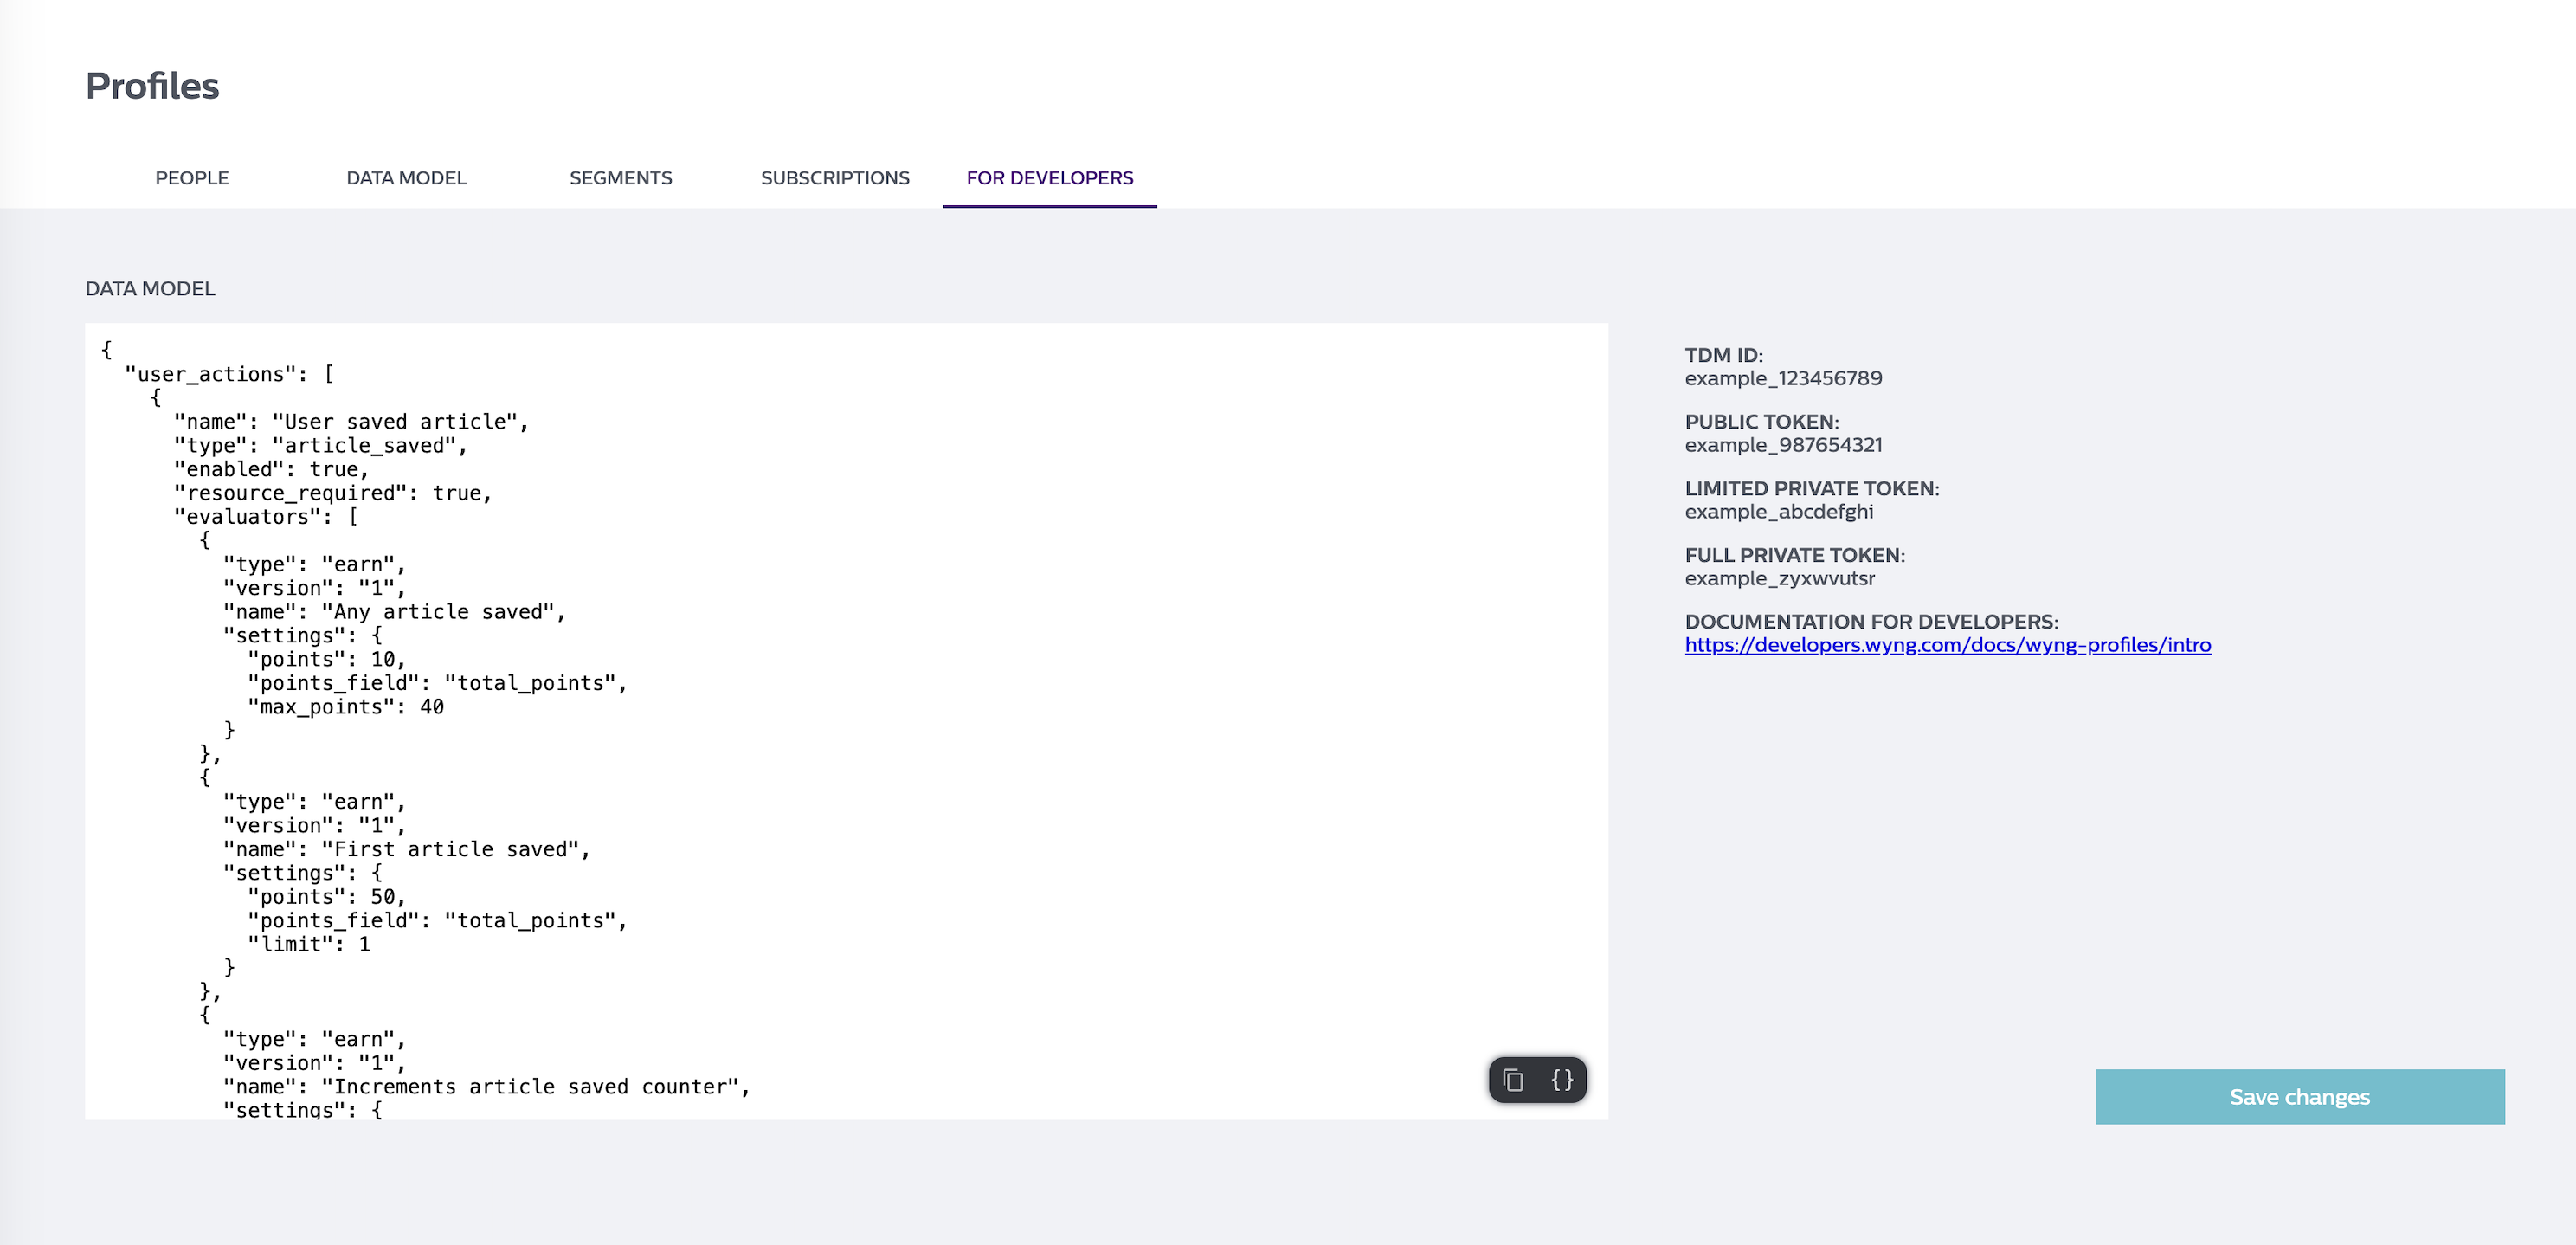
- Confirm the evaluators appear under each action in the Data Model's JSON view.
- With this in place, your evaluators are set up and you are ready to dispatch actions in Step 4.
Evaluator fields
| Field | Type | Required | What it does |
|---|---|---|---|
type | String | Yes | earn adds points, and burn subtracts points. |
version | String | No | Evaluator version. Defaults to the latest. Use "1". |
name | String | No | Human-friendly name, such as "First article saved". |
settings.points | Number | Yes | How many points to add or subtract. Always a positive number. |
settings.points_field | String | Yes | The ID of the profile attribute to update, such as total_points. |
settings.max_points | Number | No | The most points an end-user can collect from this evaluator in total. Minimum 1. |
settings.limit | Number | No | How many times an end-user can receive this evaluator's effect. Minimum 1. |
filters.starts | Date (ISO 8601) | No | The evaluator applies only from this date and time. |
filters.ends | Date (ISO 8601) | No | The evaluator applies only until this date and time. Must not be before starts. |
Wyng assigns each evaluator an id automatically. You do not need to set or manage it.
Example action and evaluator code
Reward end-users for saving articles
This action stacks three evaluators on one activity. Every "save" of an article earns 10 points up to a cap of 40. The first time an article is saved, the end-user earns a one-time 50-point bonus. A separate counter tracks the total number of articles saved by an end-user.
{
  "name": "User saved article",
  "type": "article_saved",
  "enabled": true,
  "resource_required": true,
  "evaluators": [
    {
      "type": "earn",
      "version": "1",
      "name": "Any article saved",
      "settings": {
        "points": 10,
        "points_field": "total_points",
        "max_points": 40
      }
    },
    {
      "type": "earn",
      "version": "1",
      "name": "First article saved",
      "settings": {
        "points": 50,
        "points_field": "total_points",
        "limit": 1
      }
    },
    {
      "type": "earn",
      "version": "1",
      "name": "Increments article saved counter",
      "settings": {
        "points": 1,
        "points_field": "saved_article_count"
      }
    }
  ]
}
Charge points for tickets, with seasonal pricing
Date filters let the same action behave differently over time. In this example, a ticket costs 10 points in November 2026 and 20 points in December 2026. Each purchase subtracts that amount from the end-user's total points, and the ticket counter goes up by 1 for every ticket bought in 2026.
{
  "name": "User bought ticket",
  "type": "buy_ticket",
  "resource_required": true,
  "evaluators": [
    {
      "type": "burn",
      "version": "1",
      "name": "Bought ticket in November 2026",
      "settings": {
        "points": 10,
        "points_field": "total_points"
      },
      "filters": {
        "starts": "2026-11-01T00:00:00Z",
        "ends": "2026-11-30T23:59:59Z"
      }
    },
    {
      "type": "burn",
      "version": "1",
      "name": "Bought ticket in December 2026",
      "settings": {
        "points": 20,
        "points_field": "total_points"
      },
      "filters": {
        "starts": "2026-12-01T00:00:00Z",
        "ends": "2026-12-31T23:59:59Z"
      }
    },
    {
      "type": "earn",
      "version": "1",
      "name": "Increment ticket bought count in 2026",
      "settings": {
        "points": 1,
        "points_field": "ticket_bought_in_2026_count"
      },
      "filters": {
        "starts": "2026-01-01T00:00:00Z",
        "ends": "2026-12-31T23:59:59Z"
      }
    }
  ]
}
Note that points is always written as a positive number. The evaluator type decides whether it is added or subtracted.
Example outcome
Step 4: Dispatch actions from experiences
When an end-user does something worth rewarding, you dispatch the matching action to Wyng. Wyng validates it and returns one result per evaluator, in the order they were processed, showing whether each was applied and what the attribute's value is now.
- Identify and authenticate the end-user
- Before dispatching any actions, identify the end-user with
window.wyng.profiles.identify(), using one of the Known User Identifiers defined in Step 1. For example:window.wyng.profiles.identify('customer_id', customerId). - Then authenticate the end-user with
window.wyng.profiles.authenticate(), passing their JWT. See Full example code below.
- Before dispatching any actions, identify the end-user with
- Decide when and where the action is dispatched
- Determine when the action should fire.
- On any web page or front-end web app, including Wyng experiences, use the Profiles SDK method
window.wyng.profiles.dispatchAction(). In a Wyng experience, "Enable personalization using Profiles" must also be toggled on in Experience Studio. - If the action is triggered from a back-end system or a native mobile app, use the Profiles API instead:
POST /consumer/profiles/{profile_id}/actions, authorized with a private or user JWT token. See Profiles API documentation for details.
- Fire the dispatch code
- Send the action's
type, plus aresourceif the action requires one. See Dispatch arguments below.
- Send the action's
- Wait for the result
- Wyng validates the action, applies its evaluators and returns the results. See Result arguments below.
- Finish
- Check
appliedon each result before visually telling the end-user what they earned. - With this in place, your experiences are dispatching actions. Step 5 explains how Wyng validates and records them.
- Check
Dispatch arguments (for JS SDK method)
| Argument | Type | Required | What it does |
|---|---|---|---|
type | String | Yes | The action type from Step 2, such as article_saved. |
resource | String | Only when the action has resource_required: true | Identifies what was acted on, such as an article or quiz ID. Makes each event unique. |
data | Object | No | Any optional data. Stored with the ledger record. |
Note: You do not send points or a timestamp. Points come from the action's evaluators, and Wyng timestamps the event when it is written to the ledger.
Example dispatch code (for JS SDK method)
window.wyng.profiles.dispatchAction({
  type: 'article_saved',
  resource: '1234567',
  data: {
    source_url: 'https://www.example.com/1234567'
  }
})
.then(result => {
  console.log('Dispatch response:', result)
})
.catch(error => {
  console.error('Dispatch failed:', error)
})
Result arguments
| Result field | What it means |
|---|---|
action | The action type that was processed. |
applied | true if the points changed, false if a rule held them back, such as a limit, cap, or date window. |
evaluator_id | The evaluator that produced this result. |
points | The signed change: positive for earn, negative for burn. |
points_field | The profile attribute that was targeted. |
points_field_value | The attribute's current value after this evaluator ran. |
type | earn or burn. |
Example results code
{
  "action": "article_saved",
  "results": [
    {
      "applied": true,
      "evaluator_id": "c28f8b6c-732b-47a9-a5f8-dd98d9c9c389",
      "points": 10,
      "points_field": "total_points",
      "points_field_value": 70,
      "type": "earn",
      "version": "1"
    },
    {
      "applied": false,
      "evaluator_id": "349f602d-376d-4834-854e-767d2bb4ce13",
      "points": 50,
      "points_field": "total_points",
      "points_field_value": 70,
      "type": "earn",
      "version": "1"
    },
    {
      "applied": true,
      "evaluator_id": "7a1e5d90-2b4c-4f8e-9c3a-61d0b8e2f417",
      "points": 1,
      "points_field": "saved_article_count",
      "points_field_value": 2,
      "type": "earn",
      "version": "1"
    }
  ]
}
A single dispatch can mix applied and non-applied results. Check applied on each result before telling the end-user what they earned.
Full example code (identify, authenticate, dispatch, personalize)
const customerId = 'customer_id_here'
const jwt = 'your_jwt_here'

window.wyng.profiles.identify('customer_id', customerId)
window.wyng.profiles.authenticate(jwt)
window.wyng.profiles.dispatchAction({
  type: 'article_saved',
  resource: '1234567',
  data: {
    source_url: 'https://www.example.com/1234567'
  }
})
.then(({ results }) => {
  const earned = results
    .filter(r => r.applied && r.points_field === 'total_points')
    .reduce((sum, r) => sum + r.points, 0)

  if (earned > 0) {
    console.log(`You earned ${earned} points!`)
  }
})
.catch(error => {
  console.error('Dispatch failed:', error)
})
Step 5: Validate and record
Wyng handles this step automatically. It is explained here for reference.
Every dispatched action is checked before any points move, and the result is recorded in the ledger: the permanent, time-stamped history of loyalty activity on each profile.
Only events where the action has been applied are recorded in the ledger.
- Check the action
- Wyng confirms the action
typeexists in the Data Model and is enabled, that aresourcewas sent if the action requires one, and that the end-user's profile exists and the request is authorized. - If any of these checks fail, the whole dispatch is rejected.
- Wyng confirms the action
- Check each evaluator
- Wyng confirms the current time is inside the evaluator's
startsandendswindow, and that the end-user has not reached itslimitormax_points, if set. - A failed check does not reject the dispatch. That evaluator simply returns
applied: false.
- Wyng confirms the current time is inside the evaluator's
- Update point totals
- Each applied evaluator adds or subtracts its points on its profile attribute.
- A burn is only completed when its points are applied. If a burn returns
applied: false, the end-user should not receive what they were spending points on.
- Record in the ledger
- Each applied event is written to the ledger with a timestamp. It is the source of truth for every earn and burn. Point totals on the profile are the running result, and the ledger explains how each end-user got there.
Status messages
| Status | When it happens | How it surfaces |
|---|---|---|
| Success | The action passed validation. | Results are returned. Check applied on each one. |
| Failure: Unknown action type | The type is not defined in the Data Model. | The dispatch is rejected. |
| Failure: Resource is required for this action | The action needs a resource and none was sent. | The dispatch is rejected. |
Ledger fields
| Field | Type | What it means |
|---|---|---|
data | Object | The details of the event. |
data.points | Number | Points added (positive) or removed (negative). |
data.points_field | String | The profile attribute the points were applied to. |
data.resource | String | What was acted on. |
data.source_url | String | Where the action happened, if sent when dispatching action. |
id | String | Unique ID for the ledger event. Generated by Wyng. |
timestamp | String (ISO 8601) | When the event was added to the ledger. Generated by Wyng. |
type | String | The action type. |
Example ledger data
{
  "data": {
    "points": 1,
    "points_field": "saved_article_count",
    "resource": "1234567",
    "source_url": "https://www.example.com/1234567"
  },
  "id": "1e2c7f69-551b-47fa-8fa2-271ee966d73d",
  "timestamp": "2026-11-10T16:07:35Z",
  "type": "article_saved"
}
Step 6: Review points and the ledger in the Wyng Platform
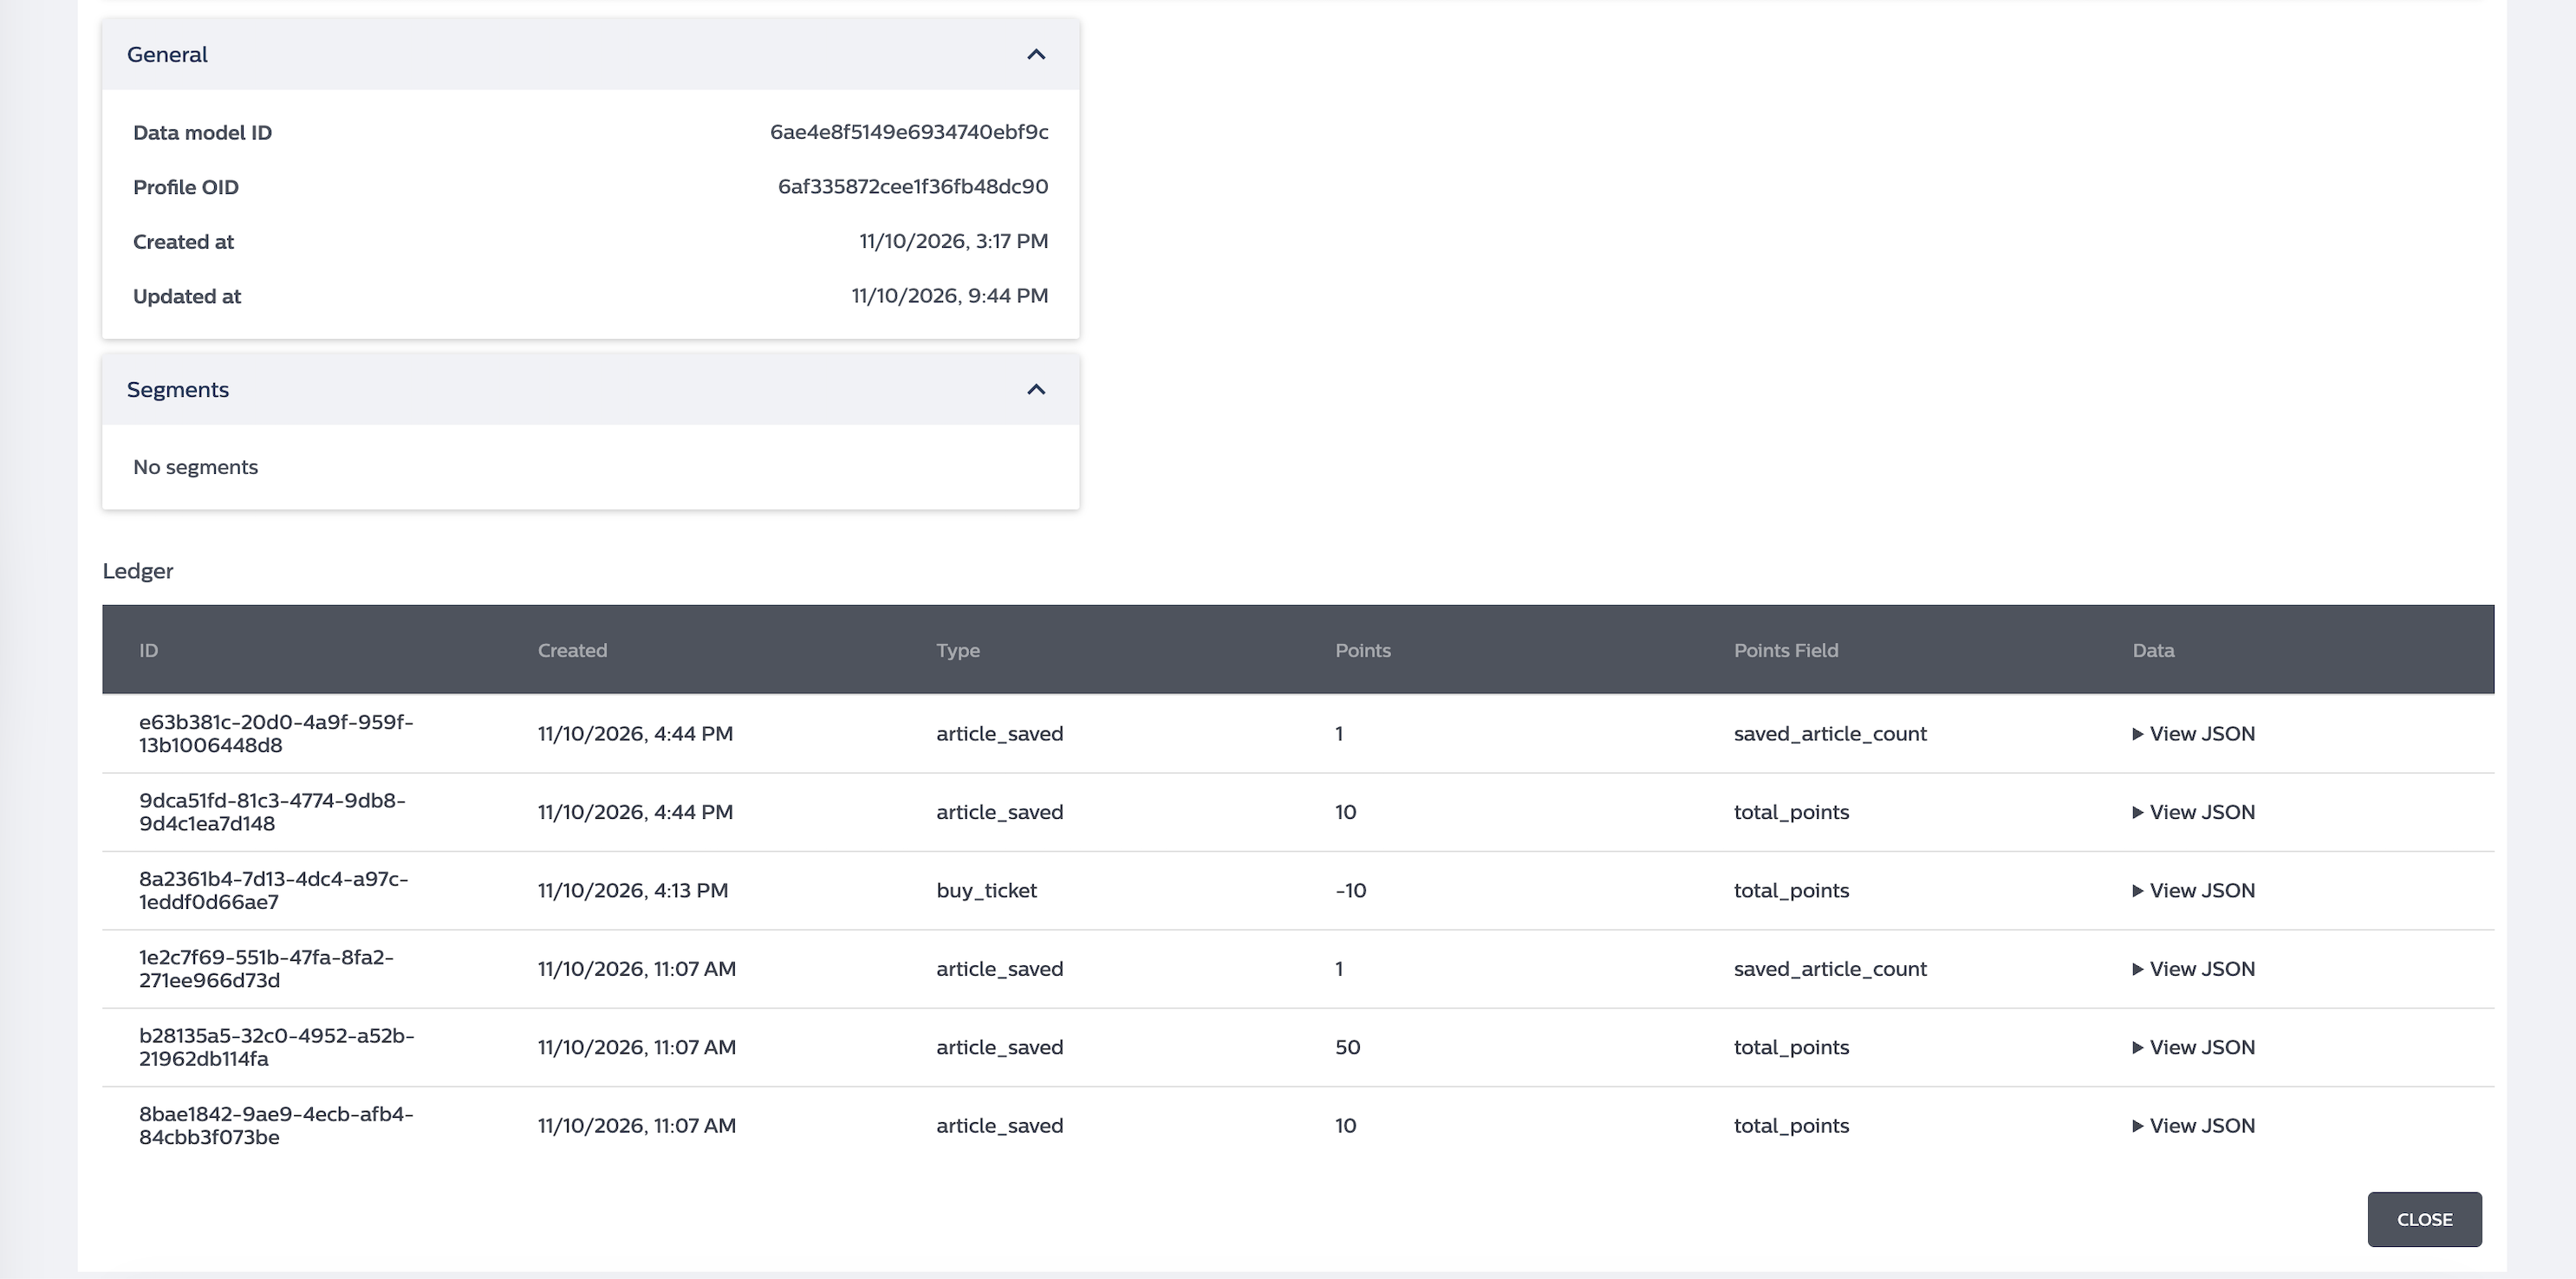
Your team can look up any profile in the Wyng Platform to see its current point totals and full ledger history.
- Find the end-user's profile
- In the Wyng Platform, open the Profiles tab.
- Click the "People" tab and find the end-user.
- Click "view details" to see more information about the user's current profile state.
- Review point totals
- Point totals appear alongside the end-user's other profile attributes, such as email and preferences. Every numeric attribute defined in Step 1 shows its current value.
- Review ledger history
- The Ledger section lists each event for the profile with its timestamp, action type, resource, points and source URL.
- Finish
- With this in place, you can confirm that loyalty data is being recorded correctly. Step 7 explains how to use it in your experiences.
Example outcome
Step 7: Use points in experiences
Once an end-user is authenticated, your experience can use the Profiles SDK to read the data collected about them, such as point totals, profile attributes, and ledger history, and tailor the experience around it.
- Identify and authenticate the end-user
- Before reading any loyalty data, identify the end-user with
window.wyng.profiles.identify(), using one of the Known User Identifiers defined in Step 1. For example:window.wyng.profiles.identify('customer_id', customerId). - Then authenticate the end-user with
window.wyng.profiles.authenticate(), passing their JWT. - If the end-user is not authenticated, only limited data is returned.
- You can skip this step if
identify()andauthenticate()have already been called, for example when dispatching an action in Step 4.
- Before reading any loyalty data, identify the end-user with
- Decide when and where loyalty data is read
- Determine when you need the end-user's points or ledger.
- On any web page or front-end web app, including Wyng experiences, use the Profiles SDK. In a Wyng experience, "Enable personalization using Profiles" must also be toggled on in Experience Studio.
- If the data is read from a back-end system or a native mobile app, use the Profiles API instead. See Profiles API documentation for details.
- Read point totals
- On a web page or front-end web app, use the Profiles SDK method
window.wyng.profiles.get(). See examples below. - From a back-end system or a native mobile app, use the Profiles API:
GET /profiles/{profile_id}to read point totals.
- On a web page or front-end web app, use the Profiles SDK method
- Read ledger history
- On a web page or front-end web app, use the Profiles SDK method
window.wyng.profiles.getLedger(). See examples below. - From a back-end system or a native mobile app, use the Profiles API:
GET /profiles/{profile_id}/eventsto read ledger history.
- On a web page or front-end web app, use the Profiles SDK method
- Tailor the experience
- Common uses include showing a points balance on the page, unlocking a reward once a threshold is reached, greying out a redemption the end-user cannot yet afford, and listing recent activity.
- Finish
- With this in place, Loyalty is fully set up. End-users can earn and spend points, and your experiences can respond to their balances and activity.
Example code to read point totals (for JS SDK method)
const fullProfile = await window.wyng.profiles.get();
console.log(fullProfile);
Example response to read point totals
{
  "email": "john.smith@email.com",
  "first_name": "John",
  "location": "Chicago",
  "saved_article_count": 2,
  "skin_concerns": ["Oily", "Combination"],
  "ticket_bought_in_2026_count": 1,
  "total_points": 70
}
Example code to read ledger history (for JS SDK method)
const ledgerEvents = await window.wyng.profiles.getLedger();
console.log(ledgerEvents);
Example response to read ledger history
[
  {
    "data": {
      "points": 10,
      "points_field": "total_points",
      "resource": "1234567",
      "source_url": "https://www.example.com/1234567"
    },
    "id": "8a41d0c3-2f7e-4b9a-a6d5-0c3e9f1b7a24",
    "timestamp": "2026-11-10T16:07:35Z",
    "type": "article_saved"
  },
  {
    "data": {
      "points": 1,
      "points_field": "saved_article_count",
      "resource": "1234567",
      "source_url": "https://www.example.com/1234567"
    },
    "id": "1e2c7f69-551b-47fa-8fa2-271ee966d73d",
    "timestamp": "2026-11-10T16:07:35Z",
    "type": "article_saved"
  },
  {
    "data": {
      "points": -20,
      "points_field": "total_points",
      "resource": "7654321",
      "source_url": "https://www.example.com/tickets/7654321"
    },
    "id": "c5f9a2e1-7b3d-4e8f-9a10-2d6b4c8e1f03",
    "timestamp": "2026-12-05T13:20:00Z",
    "type": "buy_ticket"
  },
  {
    "data": {
      "points": 1,
      "points_field": "ticket_bought_in_2026_count",
      "resource": "7654321",
      "source_url": "https://www.example.com/tickets/7654321"
    },
    "id": "4b7e1d92-0a6c-4f35-8e2b-9d1a3c5f7e60",
    "timestamp": "2026-12-05T13:20:00Z",
    "type": "buy_ticket"
  }
]
Example: An End-User's Journey
This walk-through follows one new end-user through the two example actions from Steps 2 and 3.
| # | What they do | Evaluators applied | Total points | Saved Article Count | Ticket Bought in 2026 Count |
|---|---|---|---|---|---|
| 1 | Saves their first article | • "Any article saved" +10 • "First article saved" +50 • "Increments article saved counter" +1 | 60 | 1 | 0 |
| 2 | Saves a second article | • "Any article saved" +10 • "Increments article saved counter" +1 "First article saved" has hit its limit of 1 | 70 | 2 | 0 |
| 3 | Saves a third article | • "Any article saved" +10 • "Increments article saved counter" +1 | 80 | 3 | 0 |
| 4 | Saves a fourth article | • "Any article saved" +10 • "Increments article saved counter" +1 "Any article saved" reaches its 40-point cap | 90 | 4 | 0 |
| 5 | Saves a fifth article | • "Increments article saved counter" +1 "Any article saved" returns applied: false | 90 | 5 | 0 |
| 6 | Buys a ticket in December 2026 | • "Bought ticket in December 2026" −20 • "Increment ticket bought count in 2026" +1 "Bought ticket in November 2026" is outside its dates | 70 | 5 | 1 |
Questions?
For more technical details about Profiles SDK and API methods, see:
Reach out to Wyng Support for help with any part of setting up or running loyalty tracking.